


The Short Answer: Shelf First, Ceiling When You're Ready
For most HORIZON Series owners setting up a living room or dedicated viewing space, shelf placement is the practical starting point — no drilling, no ceiling compatibility questions, and full flexibility to reposition if your room layout changes. Ceiling mounting earns its place in permanent, dedicated home theater rooms where a clean installation and zero floor-level obstructions matter more than setup convenience. For more on this topic, see How Much Does Viewing Distance Actually Matter for Perceiving 4K De....
The critical planning variable either way is keystone correction angle. XGIMI's ISA 5.0 system handles a maximum of 40° vertical and 30° horizontal — beyond those limits, you must physically relocate the projector, not just dial in more correction. And even within those limits, digital correction can reduce effective resolution slightly, which is why physical alignment always takes priority over software compensation.
Professional projection guides recommend that installers minimize keystone correction whenever possible to preserve image fidelity.
Logic Summary: The guidance below applies specifically to standard throw HORIZON Series projectors (HORIZON 20, 20 Pro, 20 Max, HORIZON S Max/Pro, HORIZON Ultra, HORIZON Pro). UST models like the AURA 2 are explicitly excluded — ceiling mounting a UST projector is not recommended because its projection angle and cooling system are optimized for tabletop use. This article is also not intended for renters who cannot drill, or for users who move their projector frequently between locations.

What Ceiling Mounting Actually Gets You (and What It Costs)
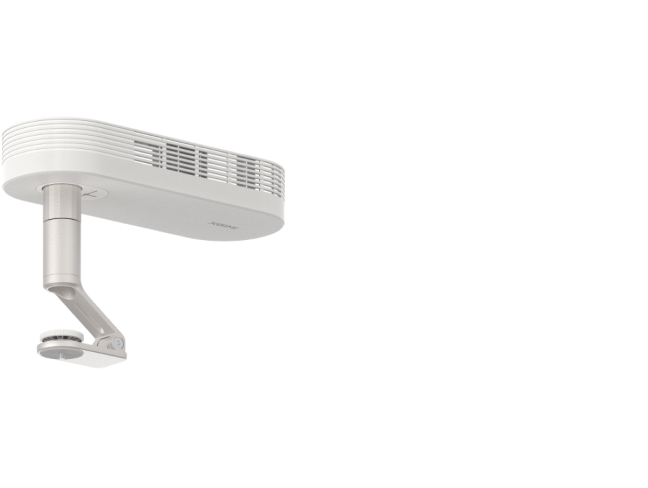
A ceiling-mounted projector sits above the viewing area, projects downward toward the screen, and stays completely out of the way of foot traffic, furniture rearrangements, and accidental bumps. For a dedicated home theater room, this is the gold standard: no one walks through the beam, cables run inside walls or along ceiling channels, and the projector becomes part of the room's architecture rather than a piece of furniture on a shelf.
The tradeoffs are real, though. Ceiling mounting requires:
- Structural verification. Drywall alone cannot support a projector mount safely. You need to hit a ceiling joist, use a toggle bolt rated for the load, or anchor into a concrete/beam ceiling. Ceiling material varies dramatically — what works in a wood-frame home may require professional drilling in a concrete apartment. XGIMI does not currently sell or officially endorse a specific ceiling mount bracket, so bracket compatibility and ceiling load capacity must be verified independently, ideally with a qualified installer.
- Inverted projection mode. All HORIZON Series projectors support ceiling-mount (inverted) mode in settings, which flips the image. This is straightforward to enable but easy to forget during initial setup.
- Cable routing commitment. Running HDMI and power cables through a ceiling or along wall channels is a one-time investment that looks clean when done well — but it's difficult to undo. Plan your cable path before drilling.
- ALR screen compatibility challenges. If you're pairing with certain types of ambient light rejecting (ALR) screens — particularly those designed for short-throw or specific viewing angles — ceiling mounting can disrupt the light reflection path. As XGIMI's guide on short-throw setups notes: "The objective of the ALR screen is defeated if the model is mounted on the ceiling, hence the ALR will not function." While some specific long-throw ALR screens accommodate steep projection angles, standard ceiling-mounted setups generally pair most consistently with matte white screens in light-controlled rooms.
One factor that significantly reduces the difficulty of ceiling mounting is optical lens shift. The HORIZON 20 Max features horizontal ±45% / vertical ±120% lens shift, which means you can physically offset the lens to align the image without relying on digital keystone correction at all. This is a major advantage: lens shift moves the optics, not the pixels, so there's zero resolution penalty. Optical adjustment methods like lens shift are widely recommended because lens shift preserves native image resolution. If ceiling mounting is your goal and image quality is a priority, the HORIZON 20 Max's lens shift range makes it the most forgiving option in the lineup.

Why Shelf Placement Is the Smarter Default for Most Rooms
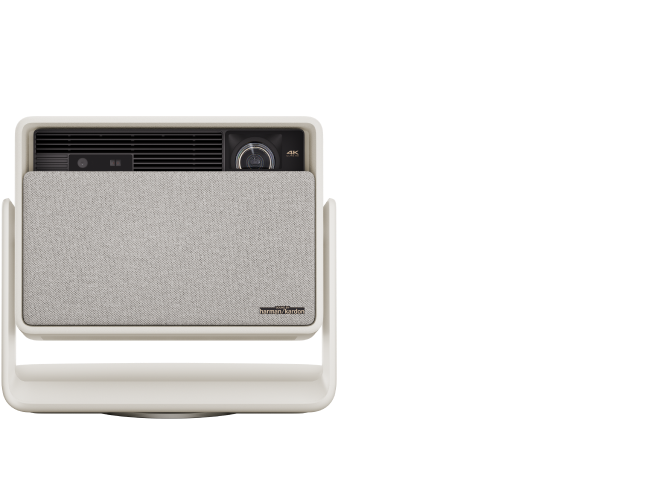
Shelf or furniture placement means the projector sits at roughly seated eye level or slightly above — on a bookshelf, AV console, dedicated projector stand, or purpose-built shelf behind the seating area. The HORIZON 20, 20 Pro, and 20 Max all include a built-in adjustable stand, which means you can angle the projector upward toward the screen without any additional hardware.
The practical advantages stack up quickly:
- No drilling, no structural concerns. You can set up, test your throw distance, and reposition the projector in an afternoon.
- Easy cable management. Power and HDMI cables run along baseboards or through cable raceways — not ideal aesthetically, but completely reversible.
- ISA 5.0 handles the geometry. Because the projector is roughly aligned with the screen center, the keystone correction angle needed is typically small — often under 10–15°, well within ISA 5.0's auto-correction capability. This minimizes any resolution impact from digital correction.
- Renter-friendly by default. No modifications to the property, no questions about ceiling load capacity, no patching holes when you move out.
The main limitation of shelf placement is the projector's presence in the room. It occupies furniture space, it can be bumped or knocked (especially relevant in family rooms with children), and cables along the floor or baseboards require management. The HORIZON 20 and 20 Pro's built-in stands help with angle adjustment, but if your shelf is significantly lower than the screen center, you'll be relying on more vertical keystone correction — which is where image quality starts to matter. For more on this topic, see How Room Shape and Furniture Layout Should Influence Your Projector....
Evidence: XGIMI's official setup guidance recommends placing the projector in a room with controlled lighting and a white or light-colored wall or screen. If that's not possible, choose the darkest available location while still maintaining adequate throw distance. This applies equally to both placement methods.
The Keystone Correction Question: When Does Digital Adjustment Start Hurting?
This is the most under-discussed aspect of projector placement decisions. Keystone correction is not free — it's a digital manipulation that remaps pixels to straighten a trapezoidal image, which inherently involves interpolation and some loss of sharpness or effective resolution. Multiple projection guides explain that digital keystone correction can reduce effective resolution.
XGIMI's ISA 5.0 is genuinely capable. It uses ToF (Time of Flight) sensors to detect the projection surface and auto-correct keystone, autofocus, wall color, and obstacle avoidance. But the system has hard limits: 40° vertical and 30° horizontal maximum. Beyond those angles, ISA cannot compensate and the projector must be physically moved.
As a practical rule of thumb: keep your correction angle under ~15–20° for 4K content where sharpness matters. At small angles, the resolution impact is minimal and often imperceptible. As correction angles grow toward 30–40°, you may notice softness at the edges of the image, particularly on fine text or detailed scenes. This behavior is widely documented in projector calibration guides explaining why keystone correction can reduce image sharpness. This isn't a flaw in ISA 5.0 — it's a fundamental property of digital image remapping that applies to all projectors.
The implication for placement decisions:
- Ceiling mount positioned directly above and behind the seating area → typically requires significant downward angle → more vertical keystone correction needed unless the projector has strong lens shift (HORIZON 20 Max's ±120% vertical lens shift addresses this directly).
- Shelf placement at roughly screen-center height → minimal keystone correction needed → best image quality from digital correction standpoint.
- Shelf placement significantly below screen center (e.g., on a low AV console) → upward angle → moderate vertical keystone correction needed → acceptable for most content, but not ideal for 4K purists.
Installation Difficulty: An Honest Comparison
Rather than a simple easy/hard rating, the real question is what kind of difficulty each method involves.
Shelf placement difficulty profile: Low technical barrier, moderate aesthetic challenge. Anyone can place a projector on a shelf and connect cables. The challenge is making it look intentional — managing cables, choosing the right shelf height, and ensuring the projector has adequate ventilation (leave at least 6–8 inches of clearance around the unit, particularly at the exhaust vents). Enclosed entertainment centers with poor airflow can cause thermal throttling over extended sessions.
Ceiling mount difficulty profile: High technical barrier, low ongoing maintenance. The installation itself — choosing the right mount, locating joists or anchors, running cables, setting inverted mode — requires planning and either DIY confidence or professional help. Ceiling material is the biggest variable: wood-frame drywall ceilings are manageable for a confident DIYer; concrete ceilings require masonry anchors and a hammer drill; beam ceilings may require a beam clamp mount. Once installed correctly, a ceiling-mounted projector requires almost no ongoing adjustment. For more on this topic, see How to Cable Manage a Ceiling-Mounted Projector Like a Pro. For more on this topic, see Projector Maintenance and Longevity: Keeping Your Setup Running Lik....
A common concern in projector communities is the permanence of ceiling mounting. As one r/projectors user noted in a frequently-cited thread: "I spent two weekends planning the ceiling mount and it took four hours to actually do it — but now I never think about it. The shelf version I had before drove me crazy every time someone moved it." The sentiment captures the real trade-off: ceiling mounting front-loads the difficulty; shelf placement distributes it as ongoing friction.
Cable Management: The Detail That Defines the Final Look
Cable management is where most projector setups succeed or fail aesthetically, and the two placement methods have very different challenges.
For shelf-placed projectors, the cables are visible but manageable:
- Use a cable raceway or conduit along the baseboard to route HDMI and power from the projector shelf to the wall outlet and source device.
- If the projector is behind the seating area, a single cable run along the back wall is often barely noticeable.
- HORIZON Series projectors connect to Google TV's built-in streaming apps, which eliminates the need for a separate streaming stick cable in many setups. External sources (gaming consoles, Blu-ray players) still require HDMI routing.
- Wireless HDMI transmitters are a legitimate option for eliminating the HDMI run entirely, though they add latency (typically 1–3 frames) that matters for gaming but not for movie watching.
For ceiling-mounted projectors, the goal is to route cables inside the ceiling and walls:
- Plan the cable path before drilling: identify where the HDMI source is located, where the power outlet is, and whether you need a new outlet near the mount or can run an extension through the ceiling.
- Use an in-wall rated HDMI cable (CL2 or CL3 rated) for any runs inside walls or ceilings — standard HDMI cables are not rated for in-wall use in most building codes.
- If running cables in-wall isn't feasible, surface-mounted cable channels painted to match the ceiling are a clean middle-ground solution.
- Budget for a ceiling-level power outlet if one doesn't exist near your mount location — this typically requires an electrician.
Logic Summary: The cable management guidance above is practical heuristic, not a building code specification. In-wall cable requirements vary by jurisdiction. If you're uncertain about electrical work or wall/ceiling penetrations in your specific building type, consult a licensed electrician or AV installer.
Renters, Families, and Future-Proofing: Matching Placement to Your Situation
If you're a renter: Shelf placement is your only realistic option unless your lease explicitly permits ceiling modifications. The HORIZON 20, 20 Pro, and 20 Max's built-in adjustable stands make shelf placement genuinely capable — you're not compromising significantly on image quality by avoiding ceiling mounting.
If you have young children or pets: Shelf placement at a high, stable location (a dedicated high shelf or wall-mounted shelf bracket that doesn't require ceiling penetration) keeps the projector accessible but reduces bump risk. ISA 5.0's intelligent obstacle avoidance will pause projection if something enters the beam path, but physical protection of the unit itself requires thoughtful placement.
If you're planning a permanent dedicated home theater: Ceiling mounting is worth the upfront investment. The clean installation, eliminated floor-level obstructions, and professional appearance pay dividends over years of use. Pair with the HORIZON 20 Max for its wide lens shift range, which minimizes digital correction even from ceiling-mount angles.
If you might upgrade to a UST projector later: Plan for shelf placement now. UST projectors like the AURA 2 are designed for tabletop use and are not suitable for ceiling mounting. A ceiling-mounted standard throw projector setup doesn't translate to a UST upgrade path — you'd be starting the installation process over.
Making the Final Call: A Placement Decision Checklist
Work through these questions in order. The first "yes" answer points to your method:
- Are you a renter, or is ceiling drilling prohibited? → Shelf placement. Full stop.
- Is your room layout likely to change in the next 1–2 years? → Shelf placement for flexibility.
- Is your ceiling material concrete, tile, or unknown? → Get a professional assessment before committing to ceiling mount.
- Is your projector shelf location within ~15° of the screen center height? → Shelf placement will deliver excellent image quality with minimal keystone correction.
- Do you have a dedicated, light-controlled home theater room and want a permanent installation? → Ceiling mounting is worth the investment.
- Is 4K image sharpness a top priority and you're ceiling mounting? → Choose the HORIZON 20 Max for its ±120% vertical lens shift to minimize digital correction.
If you're still undecided after this checklist, default to shelf placement. You can always transition to a ceiling mount later once you've confirmed your room geometry, screen position, and throw distance work for your setup. The reverse — undoing a ceiling installation — is significantly more disruptive.
To explore which HORIZON Series projector fits your planned setup, find the right HORIZON projector for your space or compare the HORIZON 20, HORIZON 20 Pro, and HORIZON 20 Max side by side.


